
Migrating from Universal Analytics to GA4
If you are working with Universal analytics we recommend you to follow the detailed migration instructions from Google. For changes in our platform, follow the instructions below. Depending on whether you use a Google Tag Manager based installation or Google Analytics directly, the instructions vary.
Prerequisites
- Create the new GA4 property and obtain the new Measurement Id.
- Follow the migration steps suggested by Google.
Google Tag Manager Integrations
In the case of integrations with Google Tag manager you don’t have to change anything in the FastSpring App, the same ID is kept. In this case you must change the internal tag configuration inside the tag manager to start using GA4, also you must change the cross site domain tracking configuration for popup front store.
Replacing universal analytics tags
Without deleting the previous universal analytics configuration, follow the instructions to configure GA4 within GTM
Modify the code for cross site tracking
If you are using a popup storefront in your website, eliminate the previous version of the decoreCallback function and all the references to the ga function, the new version of GA4 uses the new gtag name for pushing events and pageviews to google analytics. For more information about the ga and the gtag javascript function, click here. The new version of the decorateCallback function must no longer use references to the ga function.
The new decorateCallback function must looks like this:
function decorateURL(url) {
    if (window.clsid) {
        var _pl = '&clientId=' + window.clsid.client_id
            + '&sessionId=' + window.clsid.session_id;
        return url + '?' + _pl;
    }
    return url;
}
If you are using a web storefront you should be sure that the domains are linked in the google analytics platform. Follow the next steps:
- Open your Google Analytics account. Go to the Admin menu.
- Choose the GA4 property that you want to modify. Then select Data Streams.
- Choose the data stream to modify.
- Under the Google tag section, select Configure tag settings.
- Under the Settings section choose Configure your domains.
- In the form add a new row with the following data (as the following image):
a. Match type: Contains
b. Domain: onfastspring.com
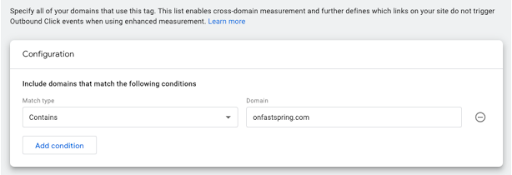
- Repeat the previous steps to also include the domains paypal.com and sofort.com
Confirmation
Once you are sure that you are collecting all the events in your GA4 platform, you can proceed to delete the old universal analytics tags.
Troubleshooting: If you are not sure if you are collecting all the events, we recommend that you follow the steps to configure GA4 within GTM
Google Analytics Integrations
To perform the google analytics migration on your website:
- Remove the old universal analytics code and all versions and references to the GA library. For additional information click here.
- Review the code for cross site tracking
Code changes for cross site tracking
When using Store Builder Library, Popup Storefront or Embedded Storefront, include the following attribute in the script that loads the FastSpring library: data-decorate-callback=”decorateURL”
Example of loading the FastSpring library with the data-decorate attribute included:
<script id="fsc-api"
src="https://d1f8f9xcsvx3ha.cloudfront.net/sbl/0.9.2/fastspring-builder.min.js"
type="text/javascript"	data-storefront="yourexamplestore.onfastspring.com/popup-yourexamplestore"
data-decorate-callback="decorateURL">
</script>
Copy and paste the following code into your page, replace the <MEASUREMENT_ID> with your own:
function decorateURL(url) {
      window.clsid = {
         client_id: '',
         session_id: ''
      };
      gtag('get', '<MEASUREMENT_ID>', 'client_id', function(r) {
         window.clsid.client_id = r
      });
      gtag('get', '<MEASUREMENT_ID>', 'session_id', function(r) {
         window.clsid.session_id = r
      });
      var _pl = '&clientId=' + window.clsid.client_id + '&sessionId=' + window.clsid.session_id;
      return url + '?' + _pl;
}
Platform Changes
For all Storefronts:
- In the FastSpring App, navigate to IIntegrations > Extensions > Google Analytics.
- Click Setup.
- Replace your Google Analytics Measurement ID in the Google Analytics Property ID field and click Enable.
For Individual Storefronts:
Only configure custom Google Analytics integration for individual Storefronts if you need to use different IDs for different Storefronts. Otherwise, configure Google Analytics integration for all Storefronts following the steps above.
- In the FastSpring App, navigate to the Storefront you want to modify and click Settings.
- Within the Storefront Settings, click Analytics Integration in the left menu.
- In the Google Analytics Integration Behavior drop-down, select Use custom Google Analytics property ID for this storefront.
Replace your Google Analytics Measurement ID in the Google Analytics > Custom Google Analytics property ID for this storefront field and click Save at the top right-hand corner of the page.
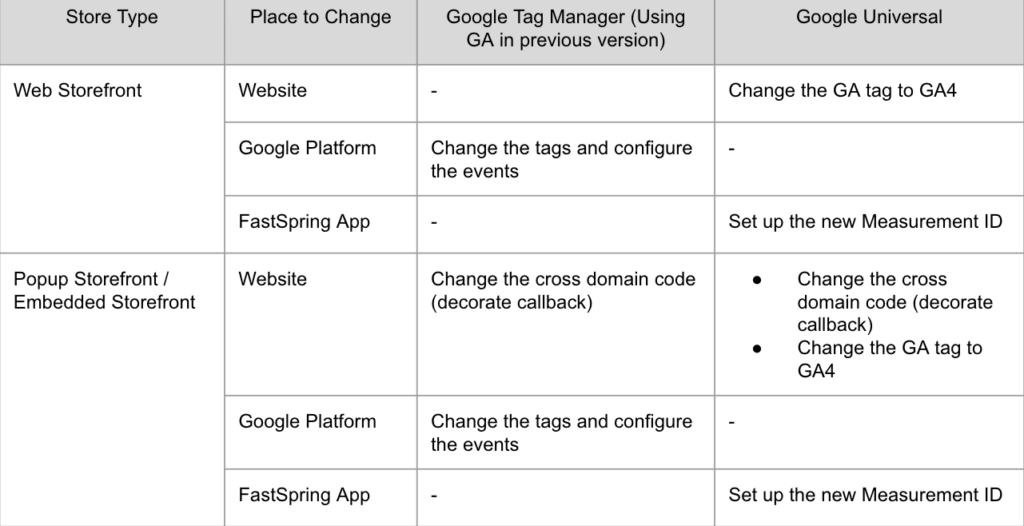
Migration Setup Table
Use the table below to identify possible steps in your migration setup. According to your storefront selection and your kind of integration there are different steps to complete the migration process. Columns refer to using Google tag manager or Google Analytics with the previous version.
Updated 4 months ago