
FastSpring WordPress Plugin
The FastSpring WordPress plugin enables you to integrate your FastSpring Store with your WordPress website. You can use the plugin to dynamically display localized product and pricing information and a full shopping cart on your website.
After you configure a Popup Storefront in the FastSpring App, the WordPress Plugin enables you to add it to your WordPress website without any manual coding. If you make future changes within the App, or update the FastSpring API, these will reflect automatically in the WordPress site.
In the example below, the example product and fulfillment settings are configured in your FastSpring Store to process payments and fulfillments. The Shopping Cart and other display blocks for your website are configured within WordPress.
Configure the FastSpring Plugin
You can download the WordPress Plugin from https://wordpress.org/plugins/fastspring/. For assistance with the download process, see WordPress Documentation. After it is downloaded, navigate to the WordPress Dashboard, and click FastSpring Settings to configure additional settings.
If you are using a Popup Storefront, whitelist your WordPress site domain for your Popup Storefront.
General Settings
- In the WordPress Dashboard, navigate to FastSpring Settings > General Settings. Configure which storefronts and SBL version WordPress uses.
- Fill out the following fields:
- Storefront ID: Enter the ID you configured for your storefront in the FastSpring App. You can find this by navigating to Storefronts > Popup Storefronts > Place on Your Website. The field following data-storefront is your Storefront ID.
- Builder URL: Paste the current Store Builder Library URL. You can find this by navigating to Storefronts > Popup Storefronts > Place on Your Website. The property following src is the URL.
- Load Font Awesome: select No if your WordPress site already includes FontAwesome. If your site does not already include FontAwesome, select Yes.
- Enable Google Analytics Tracking: Select Yes if your WordPress site already has Google Analytics tracking set up. Otherwise, select No.
- Save your changes.
Shopping Cart Settings
The Shopping Cart Settings page allows you to customize the appearance and functionality of the shopping cart feature.
- In the WordPress Dashboard, navigate to FastSpring Settings > Shopping Cart Settings. Configure which storefronts and SBL version WordPress uses.
- Fill out the following fields:
- Shopping Cart Location: Control the size and placement of the shopping cart on your WordPress page.
- Enable Mini Notification Box: Select this checkbox to display a miniature notification field that displays the number of products in the customer’s cart. This displays on all pages of your WordPress site. Customers can click this to view the shopping cart.
- Mini Notification Box Location:Control what corner of the webpage the shopping cart appears on.
- Mini Notification Box Icon: Select your preferred icon to appear in the radio box that displays the shopping cart to your customers.
- Mini Notification Box Quantity Color: Control the color of the quantity indicator in the mini notification box. By default, this is red.
- Save your changes.
Shopping Cart Appearance Settings
From the Shopping Cart Settings page, you can also customize the appearance of your shopping cart when customers are viewing items within it.
Button Settings
From the WordPress Dashboard, you can customize the appearance and behavior of all buttons on your website, including:
- Buy – Adds an item to a customer’s shopping cart and / or redirect them to the checkout page. If the customer selects the same button again, a secondary action that you configure for the button takes place. This can be removing the item from the cart, or re-opening the shopping cart.
- The Buy Button with Quantity block incorporates an interactive quantity field that allows customers to change the quantity of the product to be purchased.
- Apply Coupon – Adds a configured coupon code and the corresponding discount to the customer’s order. This only appears within the cart. If the customer enters an invalid code, an error message displays.
- Remove from Cart – Removes an item from a customer’s shopping cart. This can appear on your main webpage, as the optional secondary function of a “buy” button that your customer has already clicked. A smaller variation of this button, consisting only of an icon, appears inside the shopping cart next to each selected product. The default settings cannot be adjusted for buttons that appear within the shopping cart.
- View Cart – Directs the user to view their shopping cart on your WordPress page. This can optionally be hidden when the cart is empty. The Shopping Cart Location field on the General tab of FastSpring Settings controls the location of the cart on your page. This type of button can appear as the optional secondary function of a “buy” button that your customer has already clicked.
- Checkout – Opens the FastSpring Popup Storefront that you configured for the WordPress plugin. From there, customers can complete their purchase.
- Cross-Sell – Appear within the shopping cart when you have configured a cross-sell for a selected product. Customers can click this button to add the cross-sell item to their order. Default settings cannot be overridden in other configurations.
- Upsell – Appear within the shopping cart when you have configured an upsell for a selected product. Clicking this button replaces the original product with the upsell product. Default settings cannot be overridden in other configurations.
- EDS Buy – Adds the Extended Download Service to the customer’s order. This only appears within the shopping cart when EDS is configured for one or more of the selected products.
These default settings will apply to each button of that type on your website, however you can override them by adding a FastSpring Buy Buttons block.
Each settings page displays the some or all of the following settings:
- Default Button Action: Select the default behavior of newly created buttons.
- Default Button Class: Controls the default CSS class applied to the buttons.
- Default Button Text: Enter the default text to display on the buttons.
- Default Button Icon: Select the icon to be used for the buttons by default.
- Default Button Secondary Action: Select the default action that takes place when a customer clicks the button a second time.
FastSpring Blocks
After you have installed the FastSpring WordPress plugin and configured the default settings, you can add a FastSpring block to any of your WordPress pages. There are 10 types of FastSpring Blocks to choose from:
- Product Price – Dynamically renders the price for a specified product in the customer’s local currency
- Buy Button – A button that adds a specified product to the shopping cart and optionally opens the cart. If the button opens the cart, the cart can appear in its default location or a location that is specific to this button.
- Secondary Button – Controls the appearance and behavior of the button after a customer has clicked it, and the specified product is in the cart.
- Buy Button with Quantity – Adds a Buy Button with a quantity field that can be edited directly or adjusted using + and – controls.
- Product Image – Dynamically displays the icon image for a specified product
- Product Long Description – Dynamically renders the contents of the Long Description field for a specified product, in the customer’s local language (if you have supplied it in the FastSpring App)
- Product Summary – Dynamically renders the contents of the Summary field for a specified product, in the customer’s local language (if you have supplied it in the FastSpring App)
- Product Name – Dynamically renders the Display Name of a specified product, in the customer’s local language, if configured in the FastSpring App
- View Cart Button – Creates a button that opens the shopping cart when clicked. The shopping cart can appear in its default location or a custom location specific to this button.
- Checkout Button – Creates a button that launches your Popup Storefront so the customer can initiate checkout and payment
- Product Catalog – Creates a product catalog on your WordPress website featuring all products associated with your Popup Storefront. We recommend housing product catalogs on a separate WordPress page form the rest of your blades.
- You must specify the Popup Storefront for use here on the General page of the FastSpring Settings menu in your WordPress Dashboard.
Click Preview at the top, right corner of the page to preview the blocks that you are configuring.
Editing Blocks
To further customize individual blocks after they are added to the WordPress site, select the three dots at the top, right corner of the block. The block’s settings pane opens on the right side of the WordPress page editor.
If the block includes a Select Product drop-down, you can edit the products that appear in the drop-down through the FastSpring App. This list includes all products that are configured for the Storefront. See Adding Products to your Popup Storefront for more information.
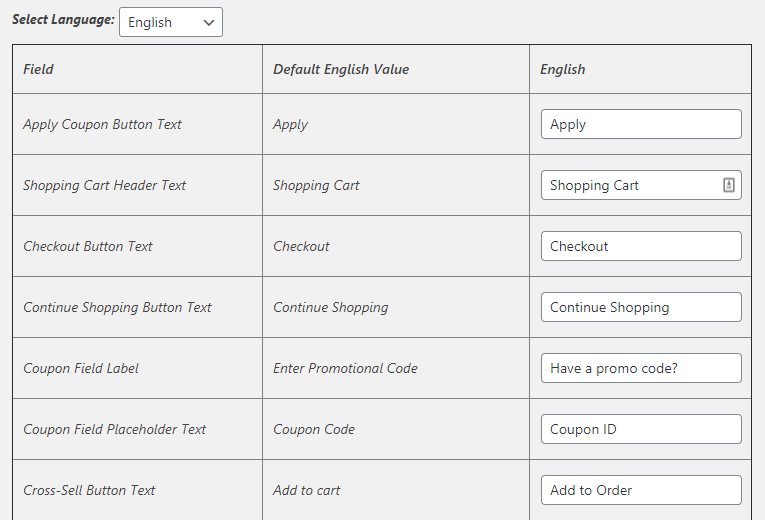
Translations
Your WordPress pages are automatically translated into 16 languages. However, you can override the default translations through the Translations tab. These only apply to the FastSpring WordPress Plugin shopping cart.
- Click the Select Language drop-down. Select the language in which you would like to enter a customized translation.
- In the right column, enter the translated text for the fields displayed in the left column. If you leave it blank, the automatic translation applies.
Custom CSS
In the Custom CSS field, you can enter custom CSS styling to be applied to all of your WordPress pages. For users with knowledge of CSS, this can be helpful in case you want to define your own classes or CSS rules. For example, you could set up additional button classes here and then apply them to the various buttons in the fields described above. Or, you could override the colors and other styles associated with the existing classes. If you override the existing classes, make sure to declare the desired colors for both the background-color and border-color properties.
Updated 5 months ago