
Google Tag Manager
If you are using Google Tag Manager to insert your Google Analytics tracking snippet, do not include your Google Analytics Measurement ID in the FastSpring App. This could result in double-counting of events and sales.
This documentation provides implementation instructions and reference materials focused on how to implement Google Analytics 4 (GA4) inside of google tag manager container and using the FastSpring GA events. GA4 is an analytics service that enables you to measure traffic and engagement across your websites and apps.
For more information about the migration from Universal Analytics to GA4 see Make the switch to Google Analytics 4.
Google Tag Manager can be used together with Google Analytics but is a separate tool. You can use Google Tag Manager to inject Google Analytics tracking scripts, but the two can also be used completely separately.
You may need to periodically update your Google Tag Manager settings to stay in compliance with changing browser standards and best practices.
Prerequisites
- Create your Google Tag Manager account and obtain your Google Tag Manager Container ID.
- Create your GA4 property and obtain your MEASUREMENT ID. You can follow instructions about it here.
- Do not set up Google Analytics integration in the FastSpring App or configure cross-domain tracking using plain code in the SBL integration.
Integration for all Storefronts
To set up Google Tag Manager integration for all storefronts:
- In the FastSpring App, navigate to Developer Tools > Extensions > Google Tag Manager.
- Click Setup.
- Enter your Google Tag Manager Container ID and click Enable.
Custom Integration for Individual Storefronts
Only configure custom Google Tag Manager integration for individual Storefronts if you need to use different IDs for different Storefronts. Otherwise, configure Google Tag Manager integration for all Storefronts following the steps above.
- In the FastSpring App, navigate to the Storefront you want to modify and click Settings.
- Within the Storefront Settings, click Analytics Integration in the left menu.
- In the Google Tag Manager Integration Behavior drop-down, select Use custom Google Tag Manager container ID for this storefront.
- Enter your Google Analytics Tracking ID in the Google Tag Manager > Google Tag Manager custom container ID for this storefront field and click Save at the top right-hand corner of the page.
Set up Variables in GTM
Fastspring adds some variables to the datalayer that can be used inside tags or triggers. Follow the steps below to add these as variables inside the Tag manager dashboard.
- Enter fsc-url as the Variable name.
- Choose Data Layer Variable as the Variable Type.
- Type fsc-url as the Data Layer Variable Name and choose Data Layer Version 2.
- Click Save.
- Repeat the steps above for the following variables:
• fsc-url
• fsc-referrer
• fsc-eventAction
• fsc-eventCategory
• fsc-eventLabel
• fsc-eventValue
• fsc-currency
• fsc-order-id – Contains the FastSpring order reference ID
• fsc-order-tax – Contains the tax amount for this order
• fsc-order-total – Contains the order total
• fsc-coupon – Contains order coupon - Create the variable “ga4-tracking-id” with Constant as the Variable Type.
- In the value field for ga4-tracking-id put your GA4 measurement ID.
For more information refer to the google help page for user defined variables.
Installing GA4 using GTM
If you want to configure google analytics 4 inside Google Tag Manager apply the following instructions:
Cross-Domain Tracking for Popup and Embedded Storefronts
Cross-domain measurement in GA4 is a Google Analytics feature that allows you to see sessions from two related sites (such as your site and fastspring app) as a single session, rather than as two separate ones. This is sometimes called ‘site linking’, and it allows you to more effectively measure the entire customer journey. When using Store Builder Library , Popup Storefront or Embedded Storefront in your site include the following attribute in the script that loads the FastSpring library: data-decorate-callback=”decorateURL”
Example of loading the FastSpring library with the data-decorate attribute included:
<script id="fsc-api"
src="https://d1f8f9xcsvx3ha.cloudfront.net/sbl/0.9.2/fastspring-builder.min.js"
type="text/javascript"	data-storefront="yourexamplestore.onfastspring.com/popup-yourexamplestore"
data-decorate-callback="decorateURL">
</script>
Copy and paste the following code into your page:
function decorateURL(url) {
if (window.clsid) {
var _pl = '&clientId=' + window.clsid.client_id
+ '&sessionId=' + window.clsid.session_id;
return url + '?' + _pl;
}
return url;
}
Configure your domains in Google Analytics
This step is required only for Web Storefronts. Enable the cross-domain measurement and further define which links on your site do not trigger Outbound Click events when using enhanced measurement.
- Open your Google Analytics account. Go to the Admin menu.
- Choose the GA4 property that you want to modify. Then select Data Streams.
- Choose the data stream to modify.
- Under the Google tag section, select Configure tag settings.
- Under the Settings section choose Configure your domains.
- In the form add a new row with the following data (as the following image):
a. Match type: Contains
b. Domain: onfastspring.com
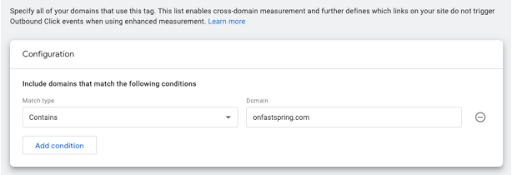
- Repeat the previous steps to also include the domains paypal.com and sofort.com.
Tag Manager GA4 tag creation
Web Storefronts
This step is required for web Storefronts.
Follow these steps to create the Google Analytics GA4 Configuration Tag using a Google Analytics: GA4 Configuration tag type:
- Click Tags > New.
- Enter
Google Analytics GA4 Configurationas the tag name. - Under Tag type, select Google Tag from the option list.
- In the Tag ID field, enter
{{ga4-tracking-id}}. - Click within the Triggering area and select New trigger (the plus sign in the top right corner).
- Next, carry out these steps in the Configuration settings section:
- Under Configuration Parameter, add a new row with the following:
- Field name:
cookie_flags - Value:
max-age=2592000;secure;samesite=none
- Field name:
- Add another row with the following:
- Field name:
send_page_view - Value:
true
- Field name:
- Under Consent Settings, select
No additional consent required.
- Under Configuration Parameter, add a new row with the following:
- Click within the Trigger configuration area, then click Triggers.
- In the Choose a Trigger panel, choose Initialization - All Pages.
- Click Save > Save.
Popup Storefront or Embedded Storefront
This step is required for Embedded and Popup Storefronts. Create the Google Analytics GA4 Configuration Tag using a Custom HTML tag type:
- Inside Google Tag Manager, go to the Tags left menu and click the New button.
- Choose the tag type Custom HTML
- Click triggers, in the Choose a Trigger panel choose “Initialization – All pages”.
- In the HTML field paste the following code:
<script async src = "https://www.googletagmanager.com/gtag/js?id={{ga4-tracking-id}}"></script>
<script>
function gtag() {
	dataLayer.push(arguments);
}
gtag('js', new Date());
if (!window.clsid) {
    gtag('config', '{{ga4-tracking-id}}', {
        'cookie_flags': 'SameSite=None;Secure',
        'page_referrer': '{{fsc-referrer}}',
        'page_location': '{{fsc-url}}',
    });
    window.clsid = {
        client_id: '',
        session_id: ''
    };
    gtag('get', '{{ga4-tracking-id}}', 'client_id', function(r) {
        window.clsid.client_id = r
    });
    gtag('get', '{{ga4-tracking-id}}', 'session_id', function(r) {
        window.clsid.session_id = r
    });
} else {
    gtag('config', '{{ga4-tracking-id}}', {
        'client_id': window.clsid.client_id,
        'session_id': window.clsid.session_id,
        'cookie_flags': 'SameSite=None;Secure',
        'page_referrer': '{{fsc-referrer}}',
        'page_location': '{{fsc-url}}'
    });
}
</script>
- Save and put the name according to your naming rules. We recommend “Custom Google Analytics GA4 Configuration” as the name for the tag.
Set up GA4 Events Tag
Events are the common way to measure all the activities of a user inside the webpage. For more information about events, click here
FastSpring platforms send to the dataLayer variable a list of events that can be used to obtain the ecommerce data and the different steps in the checkout and purchase event. There are two ways to use this information:
-
Use them directly as they come. In this scenario you can directly use the events in google analytics with their original name (like “FSC-checkoutStep1”).
-
The second scenario is to convert the Fastspring events into the standard GA4 events.
The following table shows the FastSpring events push to the dataLayer:
| Name of the event sent by FastSpring | Trigger |
| FSC-checkoutStep1 | Payment Method Selected |
| FSC-checkoutStep2 | Name Entered |
| FSC-checkoutStep3 | Email Entered (Payment Window) |
| FSC-checkoutStep4 | Payment Data Entered |
| FSC-checkoutStep5 | Payment Started |
| FSC-checkoutStep6 | Postal Code Entered |
| FSC-purchaseComplete | Purchase Complete |
| FSC-itemRemovedFromCart | Item removed from cart |
| FSC-detailedItemView | Item details viewed |
| FSC-promotionView | Related Offers viewed |
| FSC-promotionClick | Related Offer Clicked |
Use the FastSpring Events
- Click Tags > New.
- Enter FS Events as the tag name or use your naming rules.
- Select Tag Configuration > Google Analytics: GA4 Event.
- In the Configuration Tag select “None – Manually Set ID”.
- Write {{ga4-tracking-id}} for the Measurement ID.
- Write {{Event}} for the Event Name.
- Expand More Settings > Ecommerce and Select the checkbox for Enable Enhanced Ecommerce Features and Use data layer.
- Expand Advanced settings > Tag sequencing, check the Select Fire a tag before and pick the configuration tag for GA4. Check the Don’t fire option if the configuration tag fails.
- Click Save.
- Click within the Triggering area and select New trigger (the plus sign in the top right corner).
- Enter the name FastSpring Events.
- Click within the Trigger Configuration area and select Other > Custom Event.
- Enter .* in the Event name field and select the checkbox for Use regex matching.
- Select the radio button for Some Custom Events and then select Event, starts with, and enter FSC-.
- Click Save > Save.
Use the GA4 Events
You can use the FastSpring events to build new events in GTM. For example, let’s build a purchase event using the “FSC-purchaseComplete” event.
- Click Tags > New.
- Enter “Purchase Event” as the tag name or use your naming rules.
- Select Tag Configuration > Google Analytics: GA4 Event.
- In the Configuration Tag select “None – Manually Set ID”.
- Write {{ga4-tracking-id}} for the Measurement ID.
- Write purchase for the Event Name.
- Expand More Settings > Ecommerce and Select the checkbox for Enable Enhanced Ecommerce Features and Use data layer.
- Expand Advanced settings > Tag sequencing, check the Select Fire a tag before and pick the configuration tag for GA4. Check the Don’t fire option if the configuration tag fails.
- Click Save.
- Click within the Triggering area and select New trigger (the plus sign in the top right corner).
- Enter the name Purchase Event.
- Click within the Trigger Configuration area and select Other > Custom Event.
- Enter FSC-purchaseComplete in the Event name field.
- Select the radio button for All Custom Events.
- Click Save > Save.
You can add Event Parameters for your reports using the fsc variables pushed in the data layer. For a complete list of GA4 events, please review the Google Analytics 4 events reference.
For a complete detail about migrating from Universal to GA4 you can review this link Migrate to Google Analytics 4. For information about the recommended events of GA4 and the compatibility with the FastSpring events please refer to the Appendix I.
Set up the Purchase Event
There are different ways to capture the purchase event. You can directly use the event triggered by FastSpring, you can capture the custom event and then trigger the suggested “purchase” event, or finally you can capture the url /complete pageview to trigger the suggested purchase event. More details below:
Use FSC-purchaseComplete as conversion event
Any triggered event can be used as a conversion event. To configure the FSC-purchaseComplete as a conversion event you must go to your google analytics admin panel.
- In the property settings select Events
- In the table conversion events search the FSC-purchaseComplete
- For the FSC-purchaseComplete select the toggle button for “Mark as conversion”.
Build a purchase event using the “FSC-purchaseComplete” event
In the Google Tag manager use the instructions for Use the GA4 events:
- Click Tags > New.
- Enter “Purchase Event” as the tag name or use your naming rules.
- Select Tag Configuration > Google Analytics: GA4 Event.
- In the Configuration Tag select “None – Manually Set ID”.
- Write {{ga4-tracking-id}} for the Measurement ID.
- Write purchase for the Event Name.
- Expand More Settings > Ecommerce and Select the checkbox for Enable Enhanced Ecommerce Features and Use data layer.
- Expand Advanced settings > Tag sequencing, check the Select Fire a tag before and pick the configuration tag for GA4. Check the Don’t fire option if the configuration tag fails.
- Click Save.
- Click within the Triggering area and select New trigger (the plus sign in the top right corner).
- Enter the name Purchase Event.
- Click within the Trigger Configuration area and select Other > Custom Event.
- Enter FSC-purchaseComplete in the Event name field.
- Select the radio button for All Custom Events.
- Click Save > Save.
Use /complete page view as conversion event
To configure the /complete page view as the purchase event follow the next steps:
- Click Tags > New.
- Enter “Purchase Event” as the tag name or use your naming rules.
- Select Tag Configuration > Google Analytics: GA4 Event.
- In the Configuration Tag select “None – Manually Set ID”.
- Write {{ga4-tracking-id}} for the Measurement ID.
- Write purchase for the Event Name.
- Expand More Settings > Ecommerce and Select the checkbox for Enable Enhanced Ecommerce Features and Use data layer.
- Expand Advanced settings > Tag sequencing, check the Select Fire a tag before and pick the configuration tag for GA4. Check the Don’t fire option if the configuration tag fails.
- Click Save.
- Click within the Triggering area and select New trigger (the plus sign in the top right corner).
- Enter the name Page view complete.
- Click within the Trigger Configuration area select Page view as a trigger type.
- In the This trigger fires on field select Some Page Views
- In the rules section select “fsc-url” as variable, contains as operation and in the last field write “/complete”
- Click Save > Save, for saving the trigger
- Click Save > Save, for saving the tag
Troubleshooting
Sometimes it is not easy to identify why no events are received in google tag manager or why no visits are seen in Google analytics. The easiest way to diagnose using the debug tools provided by google tag manager through the tag assistant. For more details information about the debug mode click here , please read this official tag manager document before continuing.
Prerequisite for a debug session
Install the Tag Assistant Companion in your web browser.
Understanding the preview mode
In GTM you can have published changes and changes that are still in draft. These changes, although not online, can be tested using the preview mode. The preview mode means that the change will run in the browser from where the preview was launched only. Once all the changes are ready to be sent live you can publish them by generating different versions with change control.
What to look for in the debug session
Basically you have to check that the configuration tags and event tags are triggered. Tag assistant shows the tags that are launched and their order. Inside each one of them you can see the information that is launched through the datalayer variable. In the integration with fastspring you can initially see the launching of the tags in the seller’s website and when the checkout form is opened you can see the launching of the tags in the FastSpring side. Please check the following list:
- Configuration tag is launched on the website side.
- The configuration tag is launched on the fastspring checkout side.
- Events associated with selecting the payment method, entering the name, entering the address data or any other FastSpring event are triggered.
- The configuration tags should be triggered first and then the event tags. The order is important. In case the configuration tag has not been launched the event tags do not generate measurement in google analytics.
- Verify that after a purchase the purchase event is triggered after the configuration tag.
Common Issues
Purchase Event
One of the most common problems is the execution of the purchase event. It is useful when you want to check the conversion of visitors into buyers and helps to optimize campaigns. The GTM event fastspring documentation mentions three alternatives for setting up conversion events associated with the purchase event. If you are not receiving the events properly, we recommend that you use one of the alternatives. Set up purchase event
No analytics hits
Another common problem is seeing events being launched but not seeing visits within google analytics. Make sure that the configuration tags are being triggered in the correct order and check the Tag Sequencing settings to ensure that no events are triggered without their configuration tag.
Cross site tracking issues
The reason for cross site tracking configurations is that a visitor who makes a purchase is required to be stored in google analytics as a single session from the possible campaign origin to the “Thank you page” or “Complete page”. This allows purchases to be attributed to different campaigns in a precise way and thus to be able to make the right investment decisions on the campaigns. If the registered purchases are not bringing with them the information of the source or referrer, the following points should be checked:
- Web Storefront: Check the configuration of connected domains within the stream in google analytics.
- Check the step: Configure your domains in Google Analytics
- Popup or Embedded Storefront: Check the configuration of the decorateCallback script in the integration with the SBL library. This function explicitly passes the client_id and session_id so that when the checkout window is opened, the same session in which the buyer’s information is being collected is maintained.
Appendix I
| Event | Trigger when | CAN BE CREATED |
| add_payment_info | a user submits their payment information | YES |
| add_shipping_info | a user submits their shipping information | YES |
| add_to_cart | a user adds items to cart | YES |
| add_to_wishlist | a user adds items to a wishlist | N/A |
| begin_checkout | a user begins checkout | YES |
| generate_lead | a user submits a form or a request forinformation | N/A |
| purchase | a user completes a purchase | YES |
| refund | a user receives a refund | N/A |
| remove_from_cart | a user removes items from a cart | YES |
| select_item | a user selects an item from a list | YES |
| select_promotion | a user selects a promotion | YES |
| view_cart | a user views their cart | YES |
| view_item | a user views an item | YES |
| view_item_list | a user sees a list of items/offerings | YES |
| view_promotion | a user sees a promotion | YES |
Updated about 2 months ago