
Zapier
This article provides information about using Zapier to manage your FastSpring webhooks.
About Zapier
Zapier is a third-party, user-friendly, online automation tool that makes it easier to connect two or more unrelated web applications. Usually, when two systems do not integrate directly, middleware must be coded and hosted to handle communication between the systems. Using Zapier, however, these communications can be processed, and tasks can be dynamically triggered using only a limited amount of coding.
FastSpring sellers may choose to use Zapier to parse their webhook event posts and then pass that data to external solutions. For example, Zapier may be able to post the parsed data to CRM tools or accounting tools such as QuickBooks).
Important
Zapier is a separate company and is not related to FastSpring. Please bear the following in mind:
The information in this article is provided as a convenience only and is subject to change without notice.
- FastSpring makes no claim and offers no warranty or guarantee regarding the availability or uptime of any third-party service, including Zapier.
- You are responsible for GDPR compliance and the security of all webhook event data that FastSpring may post, at your direction, to the endpoints specified in your FastSpring Store. This includes URLs of apps/services hosted by your company or by any third party (e.g., Zapier). For information from Zapier regarding their service’s GDPR status, please see Zapier GDPR
- Zapier offers various pricing plans, including a free plan. To use the service, you must have a Zapier account. You may also need a paid plan. For more on Zapier’s pricing, see https://zapier.com/pricing
Setting Up a Zap to Parse a Webhook Event
Note: We recommend creating a separate “zap” for each FastSpring webhook event (e.g., order.completed) to which you want to subscribe, to avoid complications on the Zapier side.
- After creating your Zapier account, log on at https://zapier.com/app/login
- From the menu at the top of the page, click Make a Zap!.

- In the left-hand pane, click the Name Your zap field and enter a name for the zap. For example, you might give it a name matching the webhook event that you plan to send to this zap (e.g., order.completed).
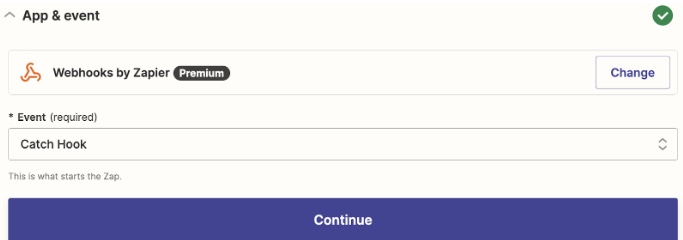
- In the central area of the page, under Choose a Trigger App, select Webhooks.

- Under App & Event Select Catch Hook and then click Continue.
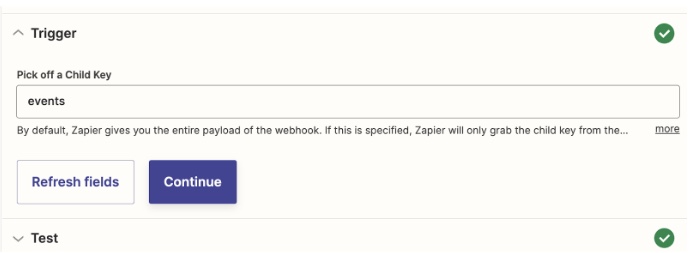
- Under Trigger and Pick off a Child Key enter ‘Events’
- In the Pick a Sample to Set Up your Zap dialog, click Copy to copy the Zapier URL to your clipboard.
- Log on to the FastSpring App at https://app.fastspring.com.
- On the Webhooks tab of the Developer Tools menu, click Add Webhook.
- In the Title field of the Add Webhook dialog, enter a name for the new configuration, such as Zapier. You can add multiple Zapier URLs to the same configuration as needed.
- In the Get webhooks from field, select whether you want to send events for live orders, test orders, or both to Zapier.
- Click Add
- In the newly created Zapier configuration, click Add Webhook URL.
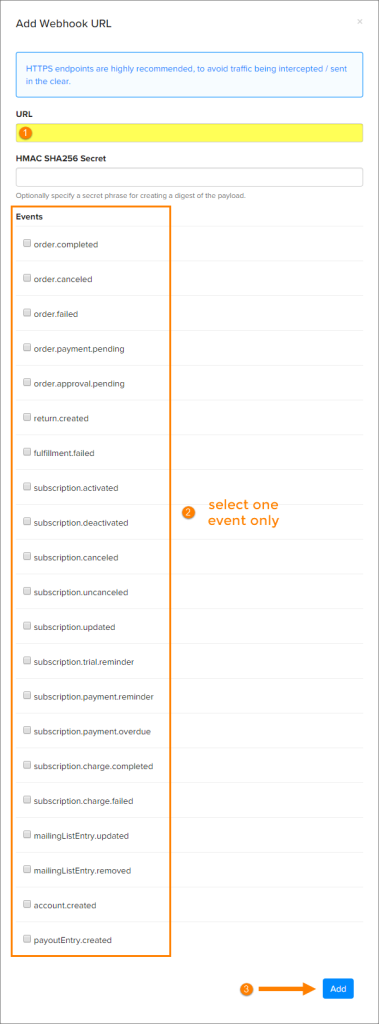
- In the Add Webhook URL dialog, click the URL field and paste in the URL that you copied from your Zapier zap above. Then, select the checkbox next to the webhook event to which you want to subscribe, and click Add. Reminder We recommend creating a separate “zap” for each FastSpring webhook event type (e.g., order.completed) to which you want to subscribe. Otherwise, you may experience complications on the Zapier side. Therefore, you should only select one event to be posted to the zap URL you are pasting in.
- Back in your browser tab with the Zapier page, click OK, I did this in the still-open Pick a Sample to Set Up Your Zap dialog.
- In your FastSpring Store, run a test transaction or simulate the event to which you have subscribed above. For example, if you have subscribed to the order.completed event, you can place a new test order to fire that event to the new webhook configuration. Note You may need to wait a few minutes between creating a new webhook configuration and testing it (e.g., by placing a test order).
- Once Zapier has received the webhook event posting, the Pick a Sample to Set Up Your Zap dialog in your Zapier configuration will be updated. You will be able to see that an event has been received, as in the following illustration. Click Continue.
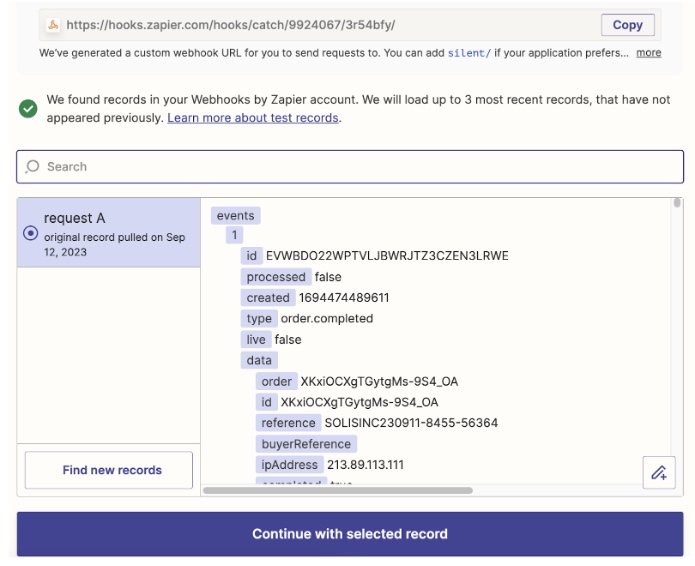
You now have access to all of the data in the event for any other steps you may add to your zap.
Next Steps
Once you have set up a zap to parse the incoming data posted from FastSpring for a particular event, the next step is to add one or more actions to your zap to do whatever you want with that data. Zapier offers actions for over 1,000 apps. For example, you might choose to use the Create Sales Receipt action with your QuickBooks Online app to send selected order data to QuickBooks conditionally. If you do not want FastSpring to post data from future test orders to the service, you could add a condition to your zap so that the action would only occur when the Boolean data live field of an order.completed webhook event is true.
If you need assistance setting up integrations from Zapier to third-party services such as QuickBooks, please contact Zapier’s support team or the support contact for the third-party service to which you want to send data.
Once you have added actions to your zap to take advantage of the data it receives, remember to turn on the zap. Turning it on makes it live and ready to execute those actions.
Updated 9 days ago